Home Blog Page 2

Flutter Hooks – scratching the surface

0

With previous experience working with React, moving to Flutter, hooks are things that I feel missing the most. Hooks help a lot in dealing with states and the life cycles of a component. Luckily, there is a package that brings hooks to Flutter: flutter_hooks. Flutter now feels so familiar.

The code written in this post is at my GitHub repo

Create a Stateful Widget

Well. we’re all (I mean those who write Flutter) know what it does and how to create it. The code snippet below shows a simple screen using the stateful widget. We have an int state _number that is initialized as 0;


class HookDemo extends StatefulWidget {
  @override
  _HookDemoState createState() => _HookDemoState();
}

class _HookDemoState extends State<HookDemo> {
  int _number = 0;
  @override
  void initState() {
    super.initState();
    _number = 1;
    print('hello');
  }

  @override
  void dispose() {
    super.dispose();
    print('good bye');
  }

  @override
  Widget build(BuildContext context) {
    return Scaffold(
      floatingActionButton: FloatingActionButton(
        onPressed: () {
          setState(() {
            _number++;
          });
        },
        child: Icon(Icons.add),
      ),
      body: Center(
        child: Text(
          _number.toString(),
          style: TextStyle(fontSize: 30),
        ),
      ),
    );
  }
}

We have initState which will be called at the very beginning this widget mounts, and for some silly reason, we set the _number to be 1 as well as printing “hello”. So that as soon as the screen is loaded, the Text widget in the body shows 1, and the console prints “hello”.

In addition, we have a dispose method which will be called when this widget is unmounted to release the resource or in this case, saying “good bye”.

We also have a FloatingActionButton which will increase the _number by one every time we tap it. Thanks to the setState method, it triggers the build method so that the widget is rebuilt to reflect the change of _number (the state).

At this point, you feel that you’re remembering how easy hooks are in React.js. And would using hooks here, in Flutter, can be as easy and less verbose?

Creating a hook widget

Let start by converting the previous example to a hook widget. It can be done as easily as extends the widget from HookWidget. Since a HookWidget doesn’t have initState or dispose, we can eradicate those 2 methods. Of course, we can’t use setState anymore, it’s now an orphan.

Don’t forget to import flutter_hooks import ‘package:flutter_hooks/flutter_hooks.dart’;

useState and useEffect

Now let’s revive the long-lost friend from React, useState. The usage is just as similar. In this case, we create a number state with the type of <int> and init value of <0>.

final number = useState<int>(0);

The other friend is useEffect, again, similar syntax. useEffect has 2 parameters, first one is the effect function that will be called the first time this widget is built and every time the dependency changes. The second parameter is an array of dependencies, which if any of the dependencies we put here changes, the effect function will be called. However, If we leave the array empty, the effect function is trigger only once when the widget mounts, kinda same effect as initState.

effect function returns another function, this is the dispose function which will be called at the time the widget unmounts.

    useEffect(
      () {
        print('hello');
        return () {
          print('good bye');
        };
      },[]
    );

Never, without a purpose, leave out the second parameter unless the effect function will be triggered every time any state changes. 

Remember, all hooks must be declared inside the build method.

import 'package:flutter/material.dart';
import 'package:flutter_hooks/flutter_hooks.dart';

class HookDemo extends HookWidget {
  @override
  Widget build(BuildContext context) {
    final number = useState<int>(0);

    useEffect(
      () {
        print('hello');
        return () {
          print('good bye');
        };
      },
    );

    return Scaffold(
      floatingActionButton: FloatingActionButton(
        onPressed: () => number.value++,
        child: Icon(Icons.add),
      ),
      body: Center(
        child: Text(
          number.value.toString(),
          style: TextStyle(fontSize: 30),
        ),
      ),
    );
  }
}

Available hooks

If you think despite that similar to React hooks, it’s not enough to convince you to use Flutter hooks, there are more than just useState and useEffect. If you had a hard time building a widget with multiple controllers (AnimatationContrller, ScrollController,.. etc) with declaring and disposing, Flutter Hooks would be a no-brainer choice.

For example, create 3 AnimationController using hooks is as simple as this: 

 final controller = useAnimationController();
 final controller2 = useAnimationController();
 final controller3 = useAnimationController();

useAnimationController will automatically create and dispose the controller for you. Stress free!

Below are some of the available hooks. Moreover, you can create your custom hooks!!!

useEffectUseful for side-effects and optionally canceling them.
useStateCreate variable and subscribes to it.
useMemoizedCache the instance of a complex object.
useContextObtain the BuildContext of the building HookWidget.
useValueChangedWatches a value and calls a callback whenever the value changed.

More can be found at flutter_hook

Conclusion

Flutter hooks in some way, make our life as flutter developers easier when we can get rid of verbose syntaxes and boilerplates. Or if you are like me, a former React developer, it brings you ease and joy and memories,…

Flutter – The use of Selector in Provider package

When it comes to state management in Flutter, most of the time people prefer to use Provider.  A package that is most liked in pub.dev, was created by Remi, and is recommended by Flutter team. Provider is in its version 4 now and had a lot of changes as well as improvements in the past. There actually are so many posts and articles that you can find on the Internet on how to use this package. So in this post, I’m not going to iterate that loop.

source code of this post can be found here: github

The use of Consumer:

If you’ve been using Provider you probably know why and how to use Consumer. Basically, it’s the way to narrow down the widget you need to rebuild on each state update. It is ideal to use Consumer as deep in your widget tree as possible so that reduces the amount of unnecessary re-render.

Put into the context:

What if you have more than 1 thing that could be changed in your provider? That means when one value changes and notifyListeners() is called all widgets that listen to the other values in the same ChangeNotifier will be triggered to rebuild as well. And Consumer doesn’t help in this case since it listens to a whole Provider, not a particular value.

Let’s examine the code of a provider class below:

class NumberProvider extends ChangeNotifier {
  int _number1 = 0;
  int _number2 = 1;
  int get number1 => _number1;
  int get number2 => _number2;

  void add() {
    _number1++;
    _number2++;
    notifyListeners();
  }

  void addTo1() {
    _number1++;
    notifyListeners();
  }

  void addTo2() {
    _number2++;
    notifyListeners();
  }
}

And here a screen that displays number 1 and 2


class ConsummerScreen extends StatelessWidget {
  const ConsummerScreen({Key key}) : super(key: key);

  @override
  Widget build(BuildContext context) {
    print('build home');
    return Container(
      child: Scaffold(
        floatingActionButton: Row(
          mainAxisSize: MainAxisSize.min,
          children: [
            FloatingActionButton(
              heroTag: 'all',
              onPressed: () {
                context.read<NumberProvider>().add();
              },
              child: Text('all'),
            ),
            FloatingActionButton(
              heroTag: '1',
              onPressed: () {
                context.read<NumberProvider>().addTo1();
              },
              child: Text('1'),
            ),
            FloatingActionButton(
              heroTag: '2',
              onPressed: () {
                context.read<NumberProvider>().addTo2();
              },
              child: Text('2'),
            ),
          ],
        ),
        body: SafeArea(
          child: Center(
            child: Container(
              child: Consumer<NumberProvider>(
                builder: (context, provider, child) {
                  print('rebuild consumer');
                  return Column(
                    mainAxisSize: MainAxisSize.min,
                    children: [
                      Container(
                        color: Colors.red,
                        padding: EdgeInsets.all(10),
                        child: Text('${provider.number1}'),
                      ),
                      Container(
                        color: Colors.green,
                        padding: EdgeInsets.all(10),
                        child: Text('${provider.number2}'),
                      ),
                    ],
                  );
                },
              ),
            ),
          ),
        ),
      ),
    );
  }
}

I created 3 methods in the provider class that will update both numbers simultaneously or separately. But since the screen using Consumer and listens NumberProvider, it doesn’t matter which button we tap on. The widgets that display number1 and number2 both get rebuilt. In a large scale application, this leads to a waste of resource.

Selector for good:

Selector is a class in Provider package that is less known compare to Consumer yet useful. As the name suggests, Selector allows you to select a specific value in a Provider to listen to. Then when and only when that selected value changes, the widget that returns by the builder method of Selector will rebuild.

This is done by the selector function will compare the previous value and the new value whenever the provider notifies something. If the selected value is changed, then the builder method is triggered. Pretty handy eh? 

Have a look at the code below:

Container(
              child: Column(
                mainAxisSize: MainAxisSize.min,
                children: [
                  Selector<NumberProvider, int>(
                      selector: (_, provider) => provider.number1,
                      builder: (context, number1, child) {
                        print('Build num1');
                        return Container(
                          color: Colors.red,
                          padding: EdgeInsets.all(10),
                          child: Text('$number1'),
                        );
                      }),
                  Selector<NumberProvider, int>(
                      selector: (_, provider) => provider.number2,
                      builder: (context, number2, child) {
                        print('Build num2');
                        return Container(
                          color: Colors.green,
                          padding: EdgeInsets.all(10),
                          child: Text('$number2'),
                        );
                      }),
                ],
              ),
            ),

Instead of using one Consumer, I used 2 Selectors for each number. Therefore, if number1 gets updated, only the respective widget rebuilds, the other widget that displays number2 stays still.

Addition to selector 

There are some variations of Selector that you can use to listen to more than one selected value such as: Selector1, Selector2,…

But there is another way you can do that using the Tuple package and is recommended by the author of Provider:

Selector<Foo, Tuple2<Bar, Baz>>(
  selector: (_, foo) => Tuple2(foo.bar, foo.baz),
  builder: (_, data, __) {
    return Text('${data.item1}  ${data.item2}');
  }
)

read more

Conclusion

Selector class helps you narrow down the scope of widgets that needs to be rebuilt and easier to manage what the widget is listening to. Make good use of this class and save your app some redundant rebuilds

White noise player

0

A white noise player

Technical Info:

See how it works in motion

Currently finding a free source of white noise

The Membership wallet

0

An App to hold barcodes cards in your phone.

Technical Info:

Update v2 with easy access to edit or delete

Make a gradient button in Flutter

4

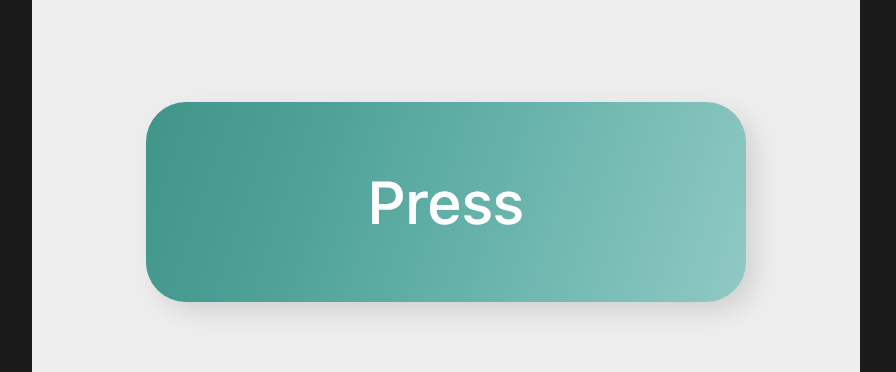
Gradient is coming back as a trend in UI design, I once have to create a button with a gradient background. Thanks to Flutter, everything seems to be easy with built-in Gradient. Unlike React Native, where you have to lean on 3rd party library.


In this article, I will show you how to create a Gradient background button using Flutter a Cross-platform framework that helps you build applications for iOS and Android.

GestureDetector

For the top level of the button, we use GestureDetector widget which helps us to detect user’s gestures such as tap, long tap, slide,… In case of a button, we only need tap.

.onTap: is where you define what the button does when user taps on it

Container

This widget is the child of the GestureDetector above. This will hold all of the UI configurations for the futton.

gradient: LinearGradient helps us build a gradient background with a list of colors. “Begin” and “end” will determine where the gradient start and finish.

boderRadius: BoderRadius create the radius for the button, this widget can help you to customize each corner with a different value.

boxShadow: this attribute is a list of BoxShadow widgets where you can declare multiple shadows for the button. In this case, I only need one shadow. I don’t want to make the button too fancy. BoxShadow widget will be configured with colors, offset – the x and y coordination of the shadow. And blurRadius let you choose how blurry the button is.

Child

Child widget of the container is where you specify what inside the button. In this post, it’s just a Text widget.

Source Code

GestureDetector(
              onTap: () {},
              child: Container(
                width: 300,
                height: 100,
                decoration: BoxDecoration(
                  gradient: LinearGradient(
                    colors: [
                      Colors.teal,
                      Colors.teal[200],
                    ],
                    begin: Alignment.topLeft,
                    end: Alignment.bottomRight,
                  ),
                  borderRadius: BorderRadius.circular(20),
                  boxShadow: [
                    BoxShadow(
                      color: Colors.black12,
                      offset: Offset(5, 5),
                      blurRadius: 10,
                    )
                  ],
                ),
                child: Center(
                  child: Text(
                    'Press',
                    style: TextStyle(
                      color: Colors.white,
                      fontSize: 30,
                      fontWeight: FontWeight.w500,
                    ),
                  ),
                ),
              ),
            ),

AskVietnamese – A Travel start-up

0

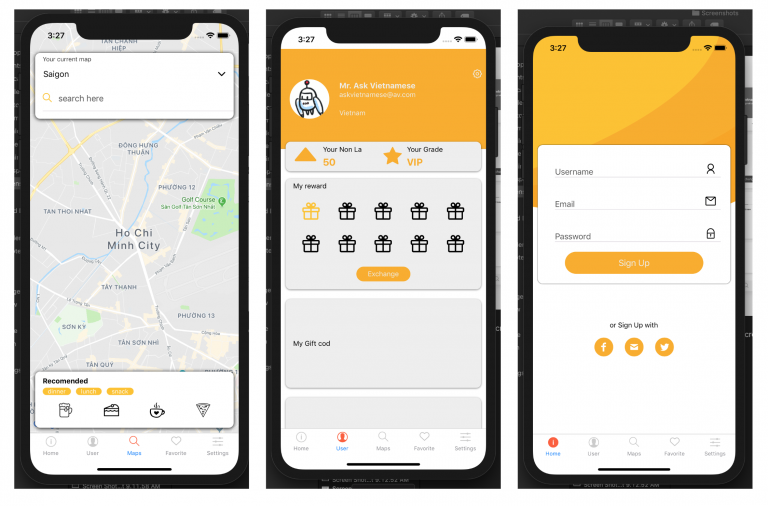
This time, I cooperate with a start-up in Vietnam. My responsibility is to make the mobile application. They provide me back-end API, and the design for the app. I just need to code the design into the real stuff.

Technical Info:

  • Status: developing
  • Language: JavaScript
  • Stack: React Native, Redux, React Navigation

Below are some screen shot of the application. The post will be updated by the project’s going on.

I even gave the app a try with motion background:

Update with animation at sign up screen

Update:

Refactor design and code. Connect with back-end API. on process

Delivery guy – trips monitoring app for delivery guy

0

A friend of mine works as a delivery guy, he asked me if I can make a mobile app that helps him tracking on every trip he makes in the day. This app helps delivery guys keep track of the amount the customer pay, and the tips that he gets from the particular trip as well as address and time.

In this application I also make some animation to give the user better experience.

Technical Info:

  • Status: on trial
  • Language: JavaScript
  • Stack: React Native, Redux, React Navigation

Description:

1. Home screen

  • Show a brief preview of the everyday total amount of customer had paid and the total tips that delivery guy had received

2. Menu / Product List

  • Handle tracking for a single day.
  • Input for every trip
  • Information about each trips on a single row with customer pay, tips, address, time.
  • Every row can be swiped left to edit, right to delete.
  • The bottom bar show the total information of the day

More pictures:

Create a bar chart with react hooks and SVG

0

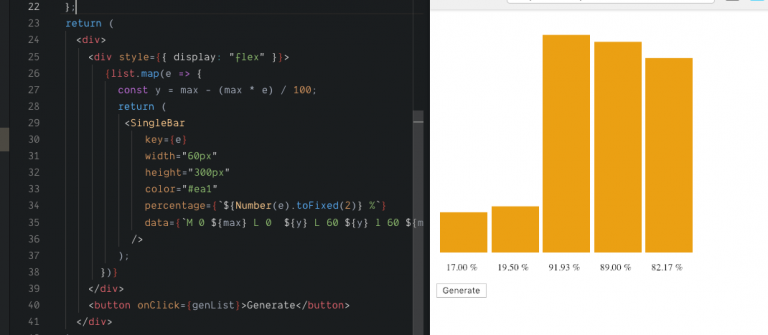
The post today is about making a dynamic bar chart with random auto-generated data. React with hooks and the use of SVG make this application easier to make and cleaner in code. We simply just need a component for a single bar and another index file of the application. And I also add some css animation that makes the bar chart animate nicely.

Click “Generate” to generate new data

What is SVG

Basically, <svg> is a tag in HTML that helps you make draw vector graphic in the browser. And vector graphic won’t be pixelated no matter how much pixel your screen is or while being zoomed in.

Inside <svg> tag, you can draw any shape you want, and in this post, we just need to draw a rectangle which is easy. I will use <path> tag, to draw the line into a rectangle.

The most important attribute of <path> tag is “d”. This d attribute will define the way that the line will be stroked. See the example below:

<path d="M 0 300 L 0  30 L 60 30 l 60 300 Z" />

I had a painful time to realize that the info for “d” is case sensitive, so don’t write it in lowercase. After the character is 2 numbers represent for X and Y of the point.

  • M: starting point
  • L: The next point that the line should go to
  • Z: tell the line to come back to the starting point

First, make a single bar

import React from "react";
import ReactDOM from "react-dom";

function SingleBar({ width, height, data, color, percentage }) {
return (
<div
style={{
display: "flex",
flexDirection: "column",
alignItems: "center"
}}
>
<svg style={{ marginLeft: 5 }} width={width} height={height}>
<path
style={{
animation: "bounce linear 400ms",
transformOrigin: "50% 100%",
margin: "auto"
}}
d={data}
fill={color}
/>
</svg>
<p style={{ fontSize: 12 }}>{percentage}</p>
</div>
);
}

export default SingleBar;

  • This SingleBar component will accept 5 parameters:
  • width and height: for defining the size of drawable svg area.
  • data: information for drawing the bar inside svg area.
  • color: you know it, for fill the color of the bar
  • percentage: display the percentage number below the bar (just a fancy stuff)

Sencond, App index

After having the SingleBar component, now it’s time to make use of it. With the sake of react hooks, I don’t need to use a class component to manage the state of the app.

import React, { useState, useEffect } from "react";
import ReactDOM from "react-dom";
import "./styles.css";

import SingleBar from "./components/SingleBar";

const max = 300;

function App() {
const [list, setList] = useState([]);

useEffect(() => {
genList();
}, []);

const genList = () => {
const list = [];
for (let i = 0; i < 5; i++) {
list[i] = Math.random() * 101;
}
setList(list);
};
return (
<div>
<div style={{ display: "flex" }}>
{list.map(e => {
const y = max - (max * e) / 100;
return (
<SingleBar
key={e}
width="60px"
height="300px"
color="#ea1"
percentage={`${Number(e).toFixed(2)} %`}
data={`M 0 ${max} L 0 ${y} L 60 ${y} l 60 ${max} Z`}
/>
);
})}
</div>
<button onClick={genList}>Generate</button>
</div>
);
}

const rootElement = document.getElementById("root");
ReactDOM.render(<App />, rootElement);

const [list, setList] = useState([]): make a list which is an array initialized to be empty, setList is a method that will be used to update the list.

genList() method is used for making an array of 5 elements with random values from 0 – 100 which is a percentage. This array will then be used to update into the state of list.

useEffect: works similar to componentDidMount method, since I want to generate the new list when the application starts. The send parameter of useEffect, in this case, is significant since it declares what to be subscribed to rerender. I put an empty [] as I don’t want anything to be watched. If you don’t provide this, the application will be rerendered constantly as the state is changed every time the useEffect is called after the application mounted.

The return() method return what will be display in the screen, basically, just map through the whole list and with each elements, it will calculate the hight of the bar and render the SingleBar component with the particular value.

Animation for the Bar

@keyframes bounce {
0% {
transform: scale(0);
}

80% {
transform: scale(1.1);
}

100% {
transform: scale(1);
}
}

I use key frame to define the animation for the bar, so it won’t be display immediately in a boring way. Every bar will be scale up from 0 t 1.1 then scale down to the actual size (1) at the end of the animation.

ReactJS – making a simple todo App with React Hooks

0

Finally , react hooks are officially released. I would give a huge change in the way we write react application. We don’t have to deal with classes and setState and some others things…

In this post I want to make a really simple todo app using react hooks, main focus on useState function, how it works and is different with the old way we using state.

What is useState?

useState is a Hook (we’ll talk about what this means in a moment). We call it inside a function component to add some local state to it. React will preserve this state between re-renders. useState returns a pair: the current state value and a function that lets you update it. You can call this function from an event handler or somewhere else. It’s similar to this.setState in a class, except it doesn’t merge the old and new state together. –https://reactjs.org/docs/hooks-overview.html#-state-hook

Examining the example below:

const [todo, setTodo] = useState("");

We destruct the results from useSate and name it to “todo” and “setTodo”.

The first variable is a state value itself, we use it when we want to get value;

The second variable is a function that is similar to setState that we will use to set/update the state.

The useState function accept one parameter which is the default value of this state.

We can have as many useState as needed

Making the Todo app with react hooks

import React, { useState } from "react";
import ReactDOM from "react-dom";

import "./styles.css";

function App() {
const [todo, setTodo] = useState("");
const [todoList, setTodoList] = useState([]);

return (
<div className="App">
<ul>
{todoList.map(e => (
<li>{e}</li>
))}
</ul>
<input
type="text"
value={todo}
placeholder="type here..."
onChange={e => setTodo(e.target.value)}
/>
<button onClick={_ => setTodoList([...todoList, todo])}>Add</button>
</div>
);
}
const rootElement = document.getElementById("root");
ReactDOM.render(<App />, rootElement);

First of all, we know that we have to use states for this app, but since hooks coming, we don’t have to make a class to have the state anymore. Functional component looks cleaner and easier.

and don’t forget to import useState from react.

 const [todo, setTodo] = useState("");

This creates a state to hold a single todo that is inputted in the input tag. The initial value is an empty string and we call set state every time the text in the input field is changed.

  const [todoList, setTodoList] = useState([]);

We need another state to holds the list of todos – todoList. and of course, this state must be initialized to an empty array. We then call setTodoList to change this state by adding the current state of todo into this array. That’s what happens in the onClick attribute of button tag.

View all codes here: https://codesandbox.io/s/0423mj2o1w

Android: Todo app – part 2, customize layout for single item

0

In the last article, we made a simple todo app, but there’s nothing more than just add tasks to the list without checking for completing. This post, we’ll make the custom layout for every single item in the list, provide the button the check for completion.

Watch the full video here:

There are 3 steps we need to do.

Create custom Layout

Create a layout with a textview to display the text of the task, and a button so that user can tap for checking the task completion.

Create a custom Adapter class: TodoAdapter

Instead of using the default adapter and default layout from android, we’ll make our own Adapter for using the custom layout that we made.

This adapter needs an arraylist to contain the list of tasks, and an Layout Inflator object to inflate the layout.

This class must be extended from BaseAdapter superclass, hence, we have to implement the abstract methods and override them.

We modify the component inside the getView method and return the view.


public class TodoAdapter extends BaseAdapter {
private ArrayList todoList;
private LayoutInflater inflater;

public TodoAdapter(ArrayList todoList, Context context) {
this.todoList = todoList;
this.inflater = (LayoutInflater) context.getSystemService(Context.LAYOUT_INFLATER_SERVICE);
}

@Override
public int getCount() {
return todoList.size();
}

@Override
public Object getItem(int position) {
return todoList.get(position);
}

@Override
public long getItemId(int position) {
return position;
}

@Override
public View getView(int position, View convertView, ViewGroup parent) {
View view = inflater.inflate(R.layout.todo_detail, null);
TextView todoText = view.findViewById(R.id.todoText);
Button completeButton = view.findViewById(R.id.completeButton);

completeButton.setText("Incompleted");
todoText.setText(todoList.get(position).toString());

return view;
}
}

Set adapter for the ListView

The last thing we need to do to make use of the custom layout is setAdapter for the listview using the TodoAdapter in MainActivity class


public class MainActivity extends AppCompatActivity {

Button addButton;
EditText inputText;
ListView todoList;
ArrayList<String> list;
TodoAdapter todoAdapter;

public void onAddItem(View view){
String text = inputText.getText().toString();

if(!text.equals("")){

list.add(text);

todoList.setAdapter(todoAdapter);

inputText.setText("");
}
}

@Override
protected void onCreate(Bundle savedInstanceState) {
super.onCreate(savedInstanceState);
setContentView(R.layout.activity_main);


addButton = findViewById(R.id.addButton);
inputText = findViewById(R.id.inputField);
todoList = findViewById(R.id.todoListView);
list = new ArrayList<>();

todoAdapter= new TodoAdapter(list, this);

}
}